How to use the Salary Placement & Equity Tool (SPET)
- Michael Brown
- Melanie Lopez
- Sandra Velasquez
- Samantha Linney
SPET – 102.00 | Date Established: 03/17/2023 Date Revised: 12/20/2023 |
General Description | Purpose The Salary Placement & Equity Tool (SPET) provides a salary range associated with an individual’s classification and relative qualifications. The equity portion is designed to ensure that incumbents in the same classification who hold similar qualifications are paid equitably and highlight any pay inequities. Internal equity will be reviewed across the College/School/Division, which is defined in Banner as a Level 3 Organization. The SPET is specifically designed for staff employees only, not faculty or student employees. Also, if working with any employee population covered by a collective bargaining unit, remember that SPET grids are still subject to compliance with any/all UNM staff collective bargaining agreements and related terms. Prerequisites This tool is intended for use by department HR initiators, HR Agents, and/or designees. A copy of the SPET Grid must be provided to Core – Human Resources (HR) along with other required documentation for qualified personnel actions.
|
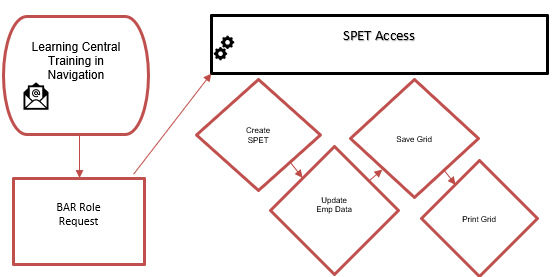
Related Documents | 1. SPET – 100.00 – How to Request the BAR Role to Access SPET a. (Learning Central training must be completed before you request a BAR Role) 2. Education and Experience Calculator 3. 101.00 – How to use the Education and Experience Calculator 4. 103.00 – How to use the Education Experience Report (if applicable) 5. 104.00 – How to use the Strategic Planning Report (if applicable) 6. SPET FAQs – Frequently Asked Questions (FAQs) |
Process Summary
|
|
Step # | Instructions | Screenshot/Details |
1 | Must have UNM credentials and SPET BAR role prior to accessing the SPET Tool. | See SOP SPET – 100.00 – How to Request the BAR Role for SPET Access. |
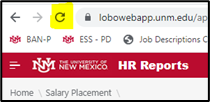
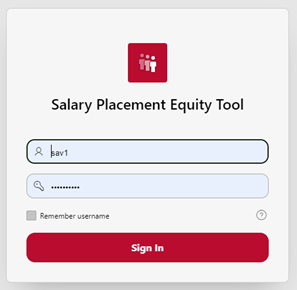
2 | Access SPET at hr.unm.edu/spet
Log in using your UNM Credentials:
Click on: the “Username” field. Enter your UNM NetID. Click on: the “Password” field. Enter your UNM password. Click on: “Sign In”. | 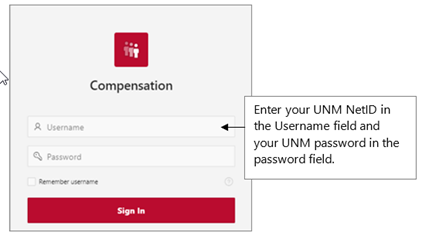 |
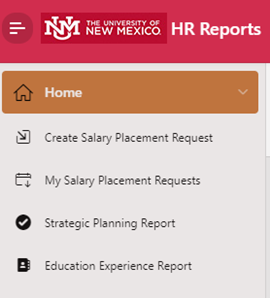
3 | Once you log in you should see this screen which will have 3 to 4 boxes based on your access:
| 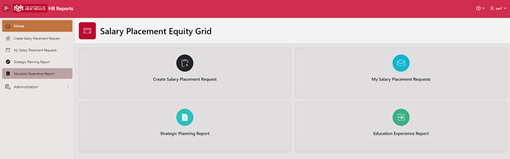 |
4 | Click on: “Create Salary Placement Request” to create a new SPET Grid.
|  |
5 | TIP: Click on the header icon with three lines. This will open the navigation sidebar for easier access. To close the navigation sidebar, click on the “X” icon. |
|
6 | Selecting your Level 3 Org Once on the Create Salary Placement Request page, start by selecting the appropriate *Level 3 org code. Depending on your BAR role, you may only have one option, or you may have many options. Regardless, SPET will only allow you to select one Level 3 org as multiple Level 3 orgs cannot be created at the same time, so make sure you select the Level 3 org related to the request. NOTE: A Level 3 at UNM is commonly known as the College/School/Division, like ABG for the College of Fine Arts, AFC for School of Medicine, or AGC for Taos campus. *Click on: the “Level 3 Org” that you need to review and click on the *Please note this is a required field. | 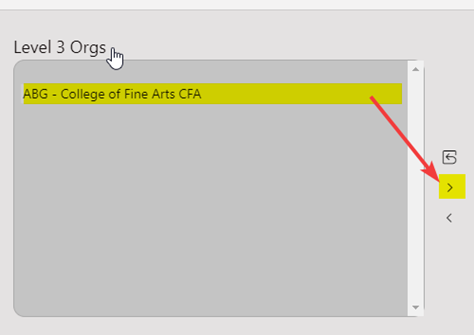 |
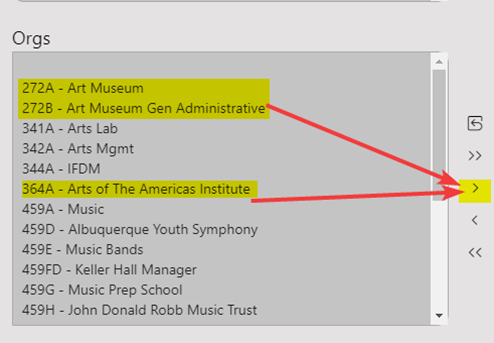
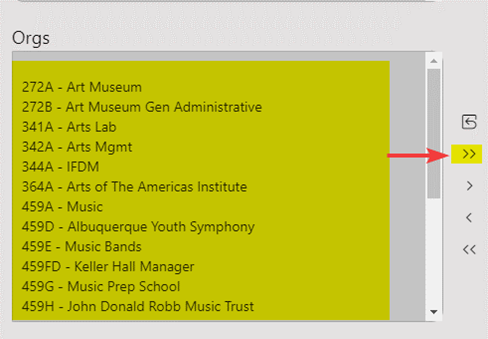
7 | Selecting your Department Org(s)
Once you have selected the appropriate Level 3 org code, then select the Level 5 department orgs that apply. NOTE: A Level 3 org is made up of a lot of smaller, Level 5 department orgs. For example, ABG, College of Fine Arts includes a lot of smaller, Level 5 department orgs, like 459A Music and 595A Art History.
* Click on: the department “Orgs” you need to review and click on the
*Please note this is a required field.
|
|
8 | *Click on: the “First Name” field and enter the first name of the hire or incumbent. *Click on: the “Last Name” field and enter the last name of the hire or incumbent. *Please note these are required fields. |
|
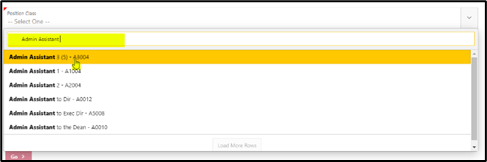
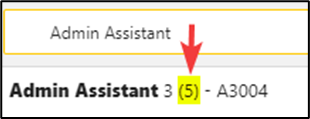
9 | *Click on: the “Position Class” down arrow and select the classification from the list. OR *Click on: the “Position Class” field and start typing the classification title, the menu will pop up and you can select from the list. NOTE: the number in parenthesis next to the classification title indicates how many incumbents are in the classification. If there are no parenthesis, then there are no incumbent in that classification for the selected orgs. *Please note this is a required field. |
|
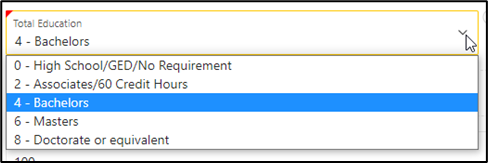
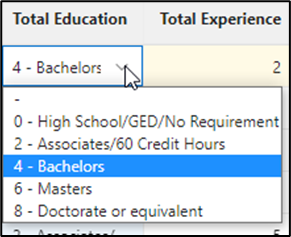
10 | *Click on: the “Total Education” field and use the drop-down menu to select the highest level of education. Do not subtract anything for minimum qualifications because the system will calculate and auto-populate the combined education and experience above the minimum.
NOTE: If you are entering education in lieu of experience, the combined total of the two will need to be at least equal to the total minimum qualifications.
*Please note this is a required field. |
|
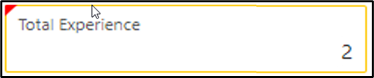
11 | *Click on: the “Total Experience” field. Enter: the total years of related experience. SPET allows for up to 2 decimal places for experience. TIP: If someone has 3.876 years of experience enter 3.88 years of experience. Do not subtract anything for minimum qualifications because the system will calculate and auto-populate the combined education and experience above the minimum.
*Please note this is a required field. |
|
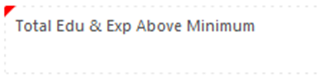
12 | The “Total Edu & Exp Above Minimum” column is auto-calculated and is the sum of the Total Education plus Total Experience, minus minimum qualifications. |
|
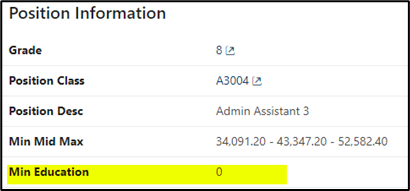
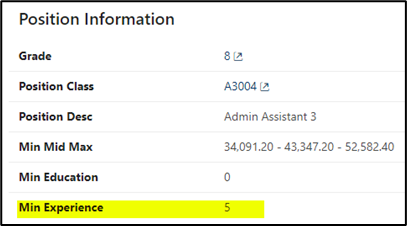
13 | To view the minimum qualifications of the classification:
At the top right corner of the screen, you will see the “Position Information” section specific to the classification you’ve selected. The employee must meet the educational minimum requirement unless otherwise stated in the job description. If the incumbent’s education is higher than the minimum education required, the points above the minimum will count towards the experience minimum requirement.
TIP:
|
|
14 | If the individual selected does not meet the minimum education and experience required for the position, the system will not let you save their information. You will receive an error message in orange on the top right corner of the grid.
TIP:
|
|
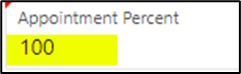
15 | This is an auto-populated field and is non-enterable. The default is 100 appointment percent. |
|
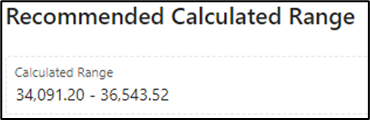
16 | Notice: The Recommended Calculated Range is under the Position Information Section. The calculated range uses current salary tables, years of education, and years of experience to calculate the recommended salary range. |
|
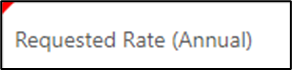
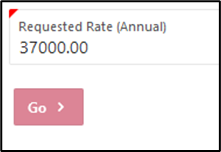
17 | *Click on: the “Requested Rate (Annual)” field. Enter: the requested rate, calculated at an annualized rate or equivalent to 1.0 FTE. For example, if you want to hire a .5 FTE employee and pay them $15.00/hour, multiply 15.00 by 2080 (the number of hours worked in a year by a full-time employee) and enter the total for the annualized amount.
TIP:
NOTE:
*Please note this is a required field. |
|
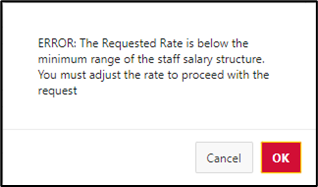
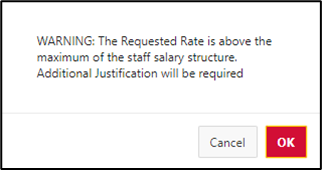
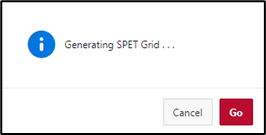
18 | Once the “Requested Rate (Annual)” field is entered, Click on: “Go”. You will receive this pop-up message. Click on “Go.” You will be redirected to your SPET library, called My Salary Placement Requests. Depending on the size of the data it may take a moment to pull up your SPET library. TIP: If you change the classification due to an error, the page may get stuck on the first classification selected. Clear out the data by refreshing the webpage. |
|
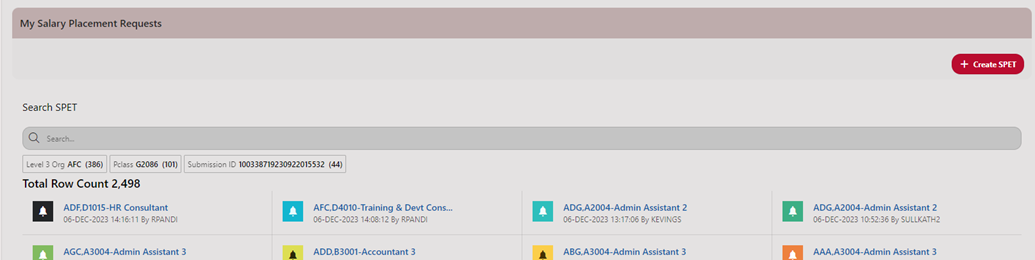
19 | You will be redirected to My Salary Placement Requests.
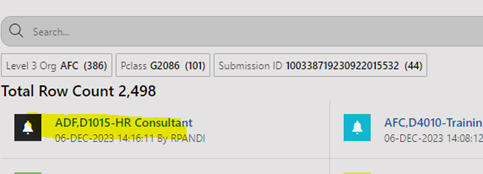
Select the grid you wish to review. The newest grid can be found on the top left corner of the screen. You can also search for prior grids using the “Search” field.
Please read the SPET Grid Instructions:
REFRESH! – You must click on the “Refresh Incumbents” button to enter any new data. Save – You must click on the Save button as you work on the SPET grid. TIP: After you save, you must click on the “Refresh Incumbents” button to pull in any updates to the data. Education and Experience Columns – Highlighted rows identify missing information and need to be populated. The highlight will disappear once you “Save.” Justification Required – Requested salaries above the “Calculated Range” will require additional justification to complete the action. Adjustments Needed to Current Salary – Adjustments must be made to salaries where a “Required” status is noted. Incumbents with comparable or greater qualifications should not be paid below the salary of the employee undergoing the requested personnel action. TIP:
| |
20 | Click on: the “Refresh Incumbents” button. This step MUST be done before you make any updates. This function will pull in current incumbent information and re-analyze any updated information. |
|
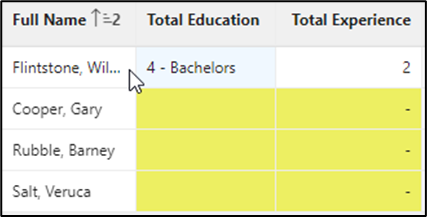
21 | For the SPET to work properly, every person needs to have a number entered for their Total Education and Total Experience. If a box is highlighted, it means there is missing information related to their Total Education and/or Total Experience. If a person has no experience or education, enter a zero; do not leave the box blank.
|
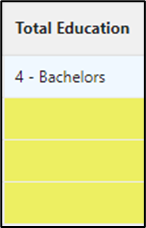
|
22 | Double click on: the “Total Education” field to make changes. If you are unable to edit these fields, click the red “Refresh Incumbents” button at the top of the SPET Grid. Remember to click on the “Save” button as you work on the SPET Grid. TIP: After you save, please click on the “Refresh Incumbents” button to update the SPET analysis based on any newly added data.
|
|
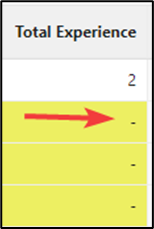
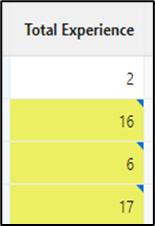
23 | Double-click on: the “Total Experience” field and enter the total relevant years of experience for each incumbent that is highlighted. You can include up to two decimals in your data entry for experience. Total experience should be the total years of job-related experience that they possess relative to the job selected. NOTE: Incumbents with existing experience entered will automatically age on the first of every month. Do not age experience yourself, leave those calculations to the SPET. | Experience added |
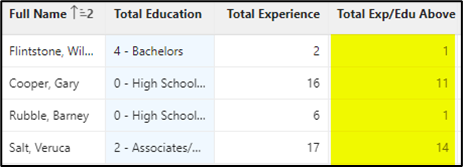
24 | Click on: “Save” to update the data you entered. Notice how the “Total Exp/Edu Above” has been populated. NOTE: The Total Edu/Exp Above Min column is the sum of the Total Education plus Total Experience, minus minimum qualifications. This column provides an easy “at a glance” point of comparison between employees in the same classification. |
|
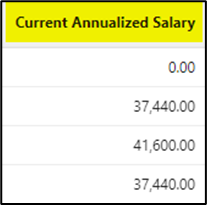
25 | “Current Annualized Salary” This field is generated from Banner for current incumbents.
NOTE: If someone is a part-time employee, their rate is converted to an annual rate to allow for consistent comparison. |
|
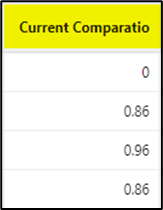
26 | “Current Comparatio” The current comparatio is based on the current salary pulled from Banner. TIP: A comparatio is a quick way to assess where a person is located within the salary range for their grade. It also allows for consistent comparison, even between different grades. The SPET calculates the comparatio by dividing the person’s current salary by the midpoint of the grade.
|
|
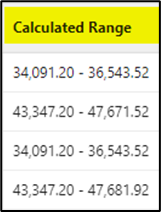
27 | “Calculated Range” The calculated range is the recommended salary range for the employee based on their total education and experience relative to the minimum qualifications for the position.
|
|
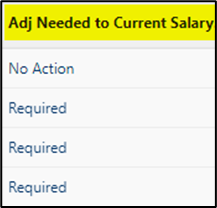
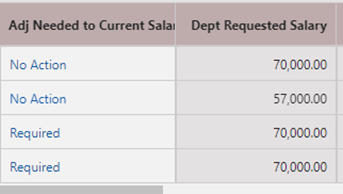
28 | Review “Adj Needed to Current Salary” There are four statuses: “No Action” means the employee is paid appropriately relative to the other staff listed within the same SPET Grid. “Recommended” does not require any salary adjustment, but departments may elect to adjust salaries within an individual's recommended SPET range (see policy UAP 3500 for eligibility). “Required” means there is an inequity that needs to be addressed. The person labeled “Required” has more edu/experience but is being paid less than the individual undergoing the requested personnel action. You must review and address the equity issue. If you cannot address the “Required” status, you must include a justification in the “Not addressing “Required” actions-Justification Required” section of the SPET. “Unknown” means the employee is missing their education and/or experience and is denoted with a dash in either the Total Education or Total Experience column. If there is no education or experience, be sure to enter a 0, do not leave blank. |
|
29 | “Dept Requested Salary” The “Dept Requested Salary” column shows the amount the dept has requested to pay a specific person and can be edited. The first time you run a SPET grid, this column will be blank for all employees EXCEPT the individual listed at the top, who should have the same salary originally entered on the first page. After reviewing the Adjustment Needed to Current Salary statuses, enter all proposed salary changes for employees with a “Required” status in the “Dept Requested Salary” column. Updated salary rates can also be included for anyone with “Recommended” status. NOTE: Fixing an inequity will NOT necessarily change the status under Adj Needed to Current Salary. Even if an inequity has been addressed, the “Required” or “Recommended” status will remain—this is to help direct the attention of other reviewers of that SPET grid.
Click on: “Save” to update this section. |
|
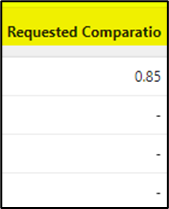
30 | “Requested Comparatio” The “Requested Comparatio” field auto-populate when you complete Step 29. This field provides an updated comparatio for the employee based on the Dept Requested Salary. The Requested Comparatio is dynamic and changes based on the salary entered in the Dept Requested Salary column.
|
|
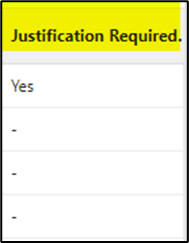
31 | “Justification Required”
The “Justification Required” field auto-populates and will either have a “Yes” or a dash for every person. A dash indicates no justification needed. A “Yes” indicates that further justification from the department is needed to proceed with the action.
|
|
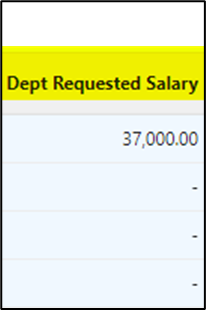
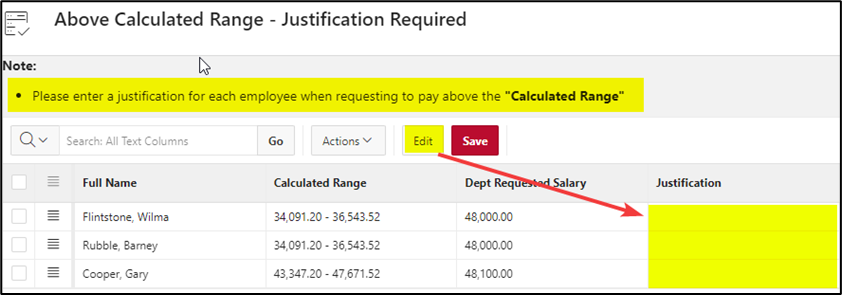
32 | Example: The Justification Required field will auto-populate as “Yes” if the salary in the Department Requested Salary field is above the Calculated Range. Notice that the first row shows the calculated range for this individual based on their education/experience within the salary grade. The department has requested a salary of $37,000.00, which is above the calculated range. The last row shows the calculated range for this individual based on education/experience within the salary grade. The department has requested a salary of $48,000.00 salary, which is above the calculated range. In both instances, a “Yes” is indicated, so a justification for these salary updates must be submitted. | |
33 | Above Calculated Range – Justification Required
To enter a required justification: Go to: the “Above Calculated Range – Justification Required” section and Enter the justification for each individual listed. Double-click on: the “Justification” field or “Edit” button and enter your notes. Follow the same instructions for all listed incumbents. | |
34 | Tab and then Click On: the “Save” button to save updates in this section. The “Commented By” and “Commented On” fields are non-enterable. The system will automatically update these fields TIP: If you want to make changes to the justification or salary information click on the "Edit" button so that you do not erase any other data. |
|
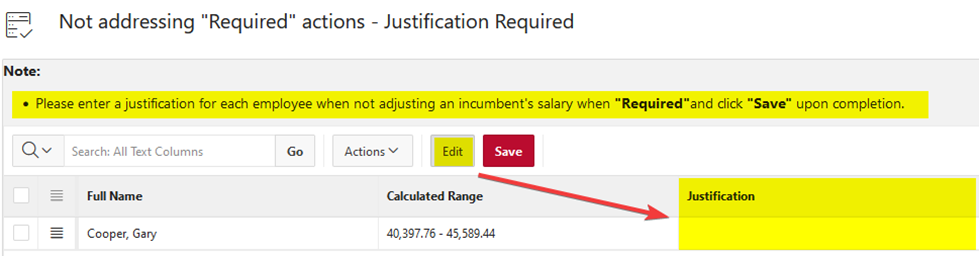
35 | Not Addressing Required Actions – Justification Required
This section is used if there is someone listed as “Required” and the department is not going to address the equity issue. To enter a required justification: Go to: the Not addressing “Required” actions – Justification Required” section and Enter the justification for each individual listed. Double-click on: the “Justification” field or “Edit” button, and enter your notes. Follow the same instructions for all listed incumbents.+ | |
36 | Tab and then click on: the “Save” button to save updates in this section. The “Commented By” and “Commented On” fields are non-enterable. The system will automatically update these fields. |
|
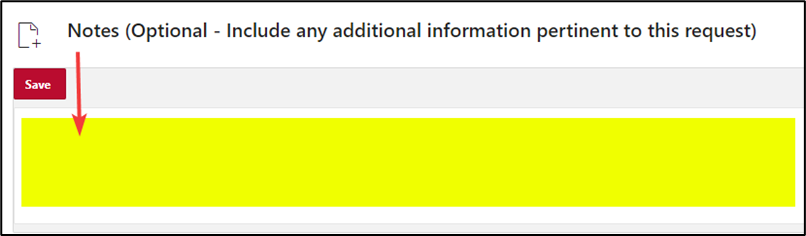
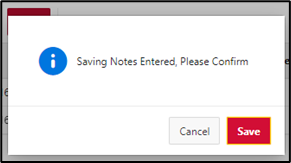
37 | Below the justification sections is a general “Notes” area, where you can list any additional information that may be relevant to this request. Click on: the “Notes” field and enter your additional information (Note: There is a 1,000-character limit in this field) Click on: the “Save” button You should receive this message: Confirm by clicking on the “Save”. | |
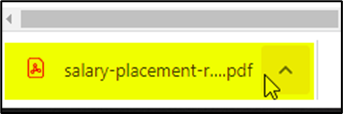
38 | You may now print your SPET grid. Click on: the “Print” icon at the top right corner of the screen and your SPET Grid will download. You will need to attach a copy of this with the associated qualifying action request. Tip: qualifying actions include: new hires, rehires, promotions, transfers, reclassifications, career ladders, demotions, and salary placement reviews. |
|
39 | Remember to submit the SPET grid with all other documents designed to address inequities for Core HR review and approval as well as other paperwork/forms associated with the action. You may also view your saved SPET Grids by clicking on the “My Salary Placement Requests” section at the left-hand side of the navigation section. | HR compensation email: comp@unm.edu
|
40 | If you need to generate another SPET Grid Click on: the “Create SPET” button on the My Salary Placement Requests page. Click on: the “+ Create SPET” button. |
|
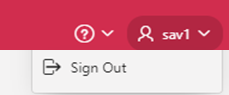
41 | You may exit the SPET Grid by clicking on the “User” icon at the top right of your screen.
Click on: the “Sign Out” section.
You will be taken back to the SPET home login page. You may now close your browser. |
|