How to use the Education and Experience Calculator
SPET – 101.00 | Date Established: 04/03/2023 Date Revised: 12/20/2023 |
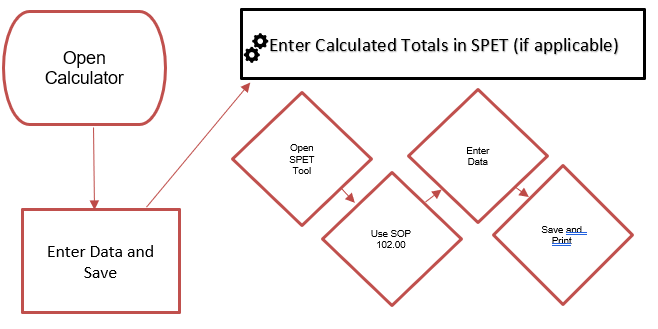
General Description | Purpose This document shows how to use the Education and Experience calculator and apply data to SPET tool.
NOTE: This version of the calculator has multiple tabs to allow you to create and save the worksheet for up to 50 individuals. |
Related Documents | 1. Education and Experience Calculator (Link) 2. SPET 100.00 – How to Request the BAR Role for SPET Access 3. SPET 102.00 – How to use the Salary Placement and Equity Tool (SPET) 4. SPET 103.00 – How to use the Education and Experience Report (if applicable) 5. SPET 104.00 – How to use the Salary Planner Report (if applicable) 6. SPET FAQs – SPET Frequently Asked Questions (FAQs) |
Process Summary |
Step # | Instructions | Screenshot/Details | |
Completing the 1st Section –Employee & Classification Data(The Education and Experience Calculator assists with identifying credit for education and relevant job-related experience) | |||
1 | Open the Calculator: Please click on the “Enable Editing” button at the top of your workbook, otherwise, it will not work. The first tab has a master sheet, automatically indexing your saved worksheets. This also provides a search feature to jump to any tab in the workbook. NOTE: The Edu and Exp calc can be used for a single incumbent or multiple incumbents. When used for multiple incumbents, a new worksheet (tab) will be used per individual. Multiple worksheets will automatically be indexed to the master sheet which can be easily referenced by the department. | ||
2 | To start data entry, click on the “Edu+Exp Calculator (1)” link. OR You can click on the tab directly on the workbook. TIP: Once you have more than 8 tabs you should use the master sheet to toggle from sheet to sheet to make it easier to navigate through the workbook. To return to the master sheet Click on: the highlighted link “Mastersheet” located at the top right side of the form. Each tab will have this link. | ||
3 | Click on: the “Employee Name” field and enter the employee’s name (if applicable). | ||
4 | Click on: “Employee Banner ID” and enter the employee’s Banner ID (if available). | ||
5 | Click on: “Department” and enter the department name (if applicable). | ||
6 | Click on: “Department Org” and enter the org code (if applicable). Note: the date auto-populates with today’s date. | ||
7 | Click on: “Completed by” and enter your name (if applicable). | ||
8 | Click on: The “Classification Title” field. Enter The exact classification title as listed within the UNM Position Classification Description Listing. Example: “Admin Assistant 3” then tab out of the field OR Click on: the drop-down menu, scroll, and find your classification. | ||
9 | Once you have selected the appropriate job title, the field will auto-populate the classification grade, minimum education, and minimum experience required for the selected classification. Note: If you notice that these are incorrect, please contact HR Compensation (comp@unm.edu). | ||
Completing the 2nd Section –Education(The degree or education does not have to be relevant to the job unless specified in the job description) | |||
10 | Click on: the “Level” field and select the employee’s, completed level of education from the dropdown menu.
You may list all degrees obtained. However, the calculator will only provide credit for the highest level completed degree. Example: If the employee has a master’s degree and a bachelor’s degree, it will only credit the highest degree (master’s). You will see this reflected in the years of education credit in the Total Education Score.
|
| |
Completing the 3rd Section –Experience(Regardless of the number of positions held or hours worked, individuals cannot receive credit for more than 40 hours a week. Identify job relevancy relative to the position’s job description.) | |||
11 | Click on: the “Employer” field and enter employer name(s). | ||
12 | Click on: the “Job Title” field and enter job title(s). | ||
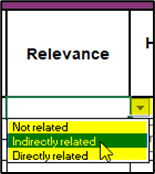
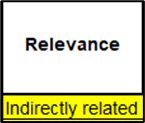
13 | Click on: the “Relevance” field and from the drop-down menu, select Relevancy: Not related, Indirectly related, or Directly related. When reviewing positions, consider the general areas of knowledge and background, complementary skills, level of responsibility, independence, and judgment needed. For a job to be considered directly related to a position, it should be related to the position; a position that is indirectly related will be somewhat related to the position; and a position that is not related will not be related to the position. | ||
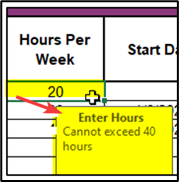
14 | Click on: the “Hours Per Week” field and enter hours worked per week (cannot exceed 40 hours). | ||
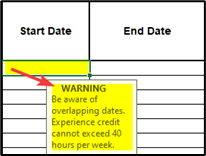
15 | Click on: the “Start Date” field Enter the job start date. NOTE: Be aware of overlapping dates. Individuals cannot receive credit for more than 40 hours of work per week, regardless of the actual number of hours worked. TIP: If the date given is (12/2020) enter 12/1/2020, the first of the month. This should be a consistent approach for all experience entries. |
| |
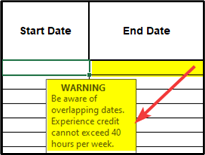
16 | Click on: the “End Date” field Enter the job end date. NOTE: Be aware of overlapping dates. Individuals cannot receive credit for more than 40 hours of work per week, regardless of the actual number of hours worked. TIP: If the date given is (12/2020) enter 12/1/2020, the first of the month. This should be a consistent approach for all experience entries. |
| |
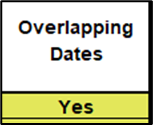
17 | This field is non-enterable: Overlapping Dates will be identified as “Yes”. If this is the case, make sure the combined total hours worked of all overlapping positions does not exceed 40 hours/week.
| ||
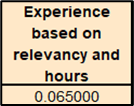
18 | This field is non-enterable: Displays the amount of experience based on relevancy. | ||
19 | Notes/Comments (optional): This section can be used to enter notes for each job. | ||
20 | Related Valid Certifications/Licenses (optional) a. This section can be used to document any certifications/licenses possessed by the individual. b. Certifications and/or licenses are not included in calculations for education or experience but may be used to justify an inequity specifically related to education and experience | ||
Section 4 –Totals(These are auto-calculated fields and cannot be modified)
| |||
21 | Total Education Score a. Auto populates. b. Calculates credit for the highest degree only. c. Degrees are not cumulative. This is the Total Education score you will enter in the SPET. | ||
22 | Total Experience Score a. Auto populates. b. Calculates combined, total experience This is the Total Experience score you will enter in the SPET. | ||
23 | Total Education & Experience Above Min Requirements a. Auto populates. b. Calculates combined, total education and experience. c. Subtracts out minimum qualifications for the position. NOTE: If the Total Education and Experience is a negative number, the individual does not meet the minimum requirements for the position. Please contact your HR Consultant to see what options you have. This information will not be entered into the SPET, as it will automatically be calculated. | ||
| |||
Troubleshooting
Issue | How to fix or correct |
Unable to find classification from the dropdown menu | Please contact HR Compensation |
Can’t remove unwanted education fields | Place your cursor in the cell you need to clear and then press the “delete” button. |
Error message when entering job start/end dates | Check to see if the dates overlap. If ‘yes’, do the combined hours exceed 40 hours/week? If the combined jobs do not exceed 40 hours/week, click “Yes” and continue. If the combined jobs exceed 40 hours/week, modify the dates and/or hours worked to adhere to the limit of 40 hours/week. If a job is modified, you must note modifications in the notes/comments section. For example, the employee had two part-time jobs at the same time - 20 hours for ABC and 20 hours for XYZ. They do not exceed the 40 hours per week limit. |
Totals do not calculate | Did you click on the “Enable” button at the top of the form? Did you select an option for Education? Did you enter the relevancy of the job? Did you enter the hours per week? Are you using the most up-to-date version of the calculator? What version of MS Office are you using? This was created using Microsoft 360. Contact Compensation (comp@unm.edu) for additional support. |
I cannot access the drop-down menu in the classification section | You may need to clear any text that is in this field. Once cleared of any text, tab out and try again. |
